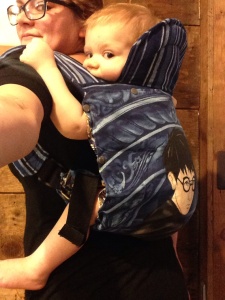
A buckle bu (or buckle onbu) is an update of the traditional Japanese carrier the onbuhimo. It shares many similarities with an SSC (soft structered carrier) but without a waist belt. Buckle onbus are intended for use with babies that can sit unassisted. It is very important that you don’t use a buckle bu that is too large, you want a snug fit in a high carry.
This tutorial will show you a basic way to make curved straps, straight straps, PFAs, chest clip, leg padding, seat darts, 2 layer body, 3 layer body, headrest, flat hood, and a reversible snap-slipcover.
Supply List
-Approximately 2.5yds of appropriate fabric
– Padding
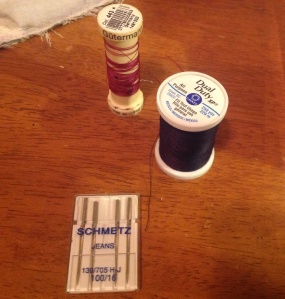
-2 spools of quality All Purpose polyester thread like Gutterman’s Sew All or Coats & Clark Dual Duty All Purpose
-Heavy duty or denim needles
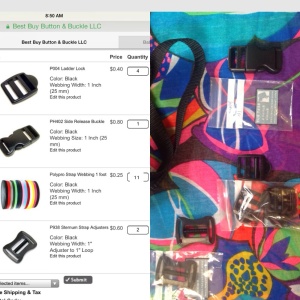
-2 sternum adjusters
-4 ladder locks
-1 single adjust side release buckle
-11ft polypropylene webbing
– Paper to make pattern
-Chalk
-Soft tape/measuring tape
-scissors
-snap pliers/press and snaps (for slipcover)
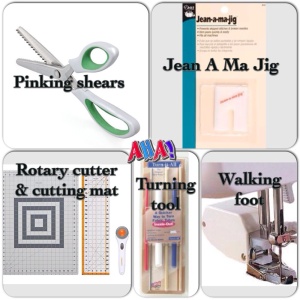
The following graphic shows some very helpful tools, you can certainly make a safe carrier without them but they make some steps easier (and sometimes look nicer). Images are from amazon.
The amount of fabric you need to buy will vary based on the width, the size you’re making,if you’re using two or three body panels, if you need fussy cuts for pattern placement, and how much shrinkage occurs during prewashing (like linen usually shrinks less than cotton). Washing in cold water can help reduce the amount a fabric shrinks. I always wash my carriers in cold water (whether they’re DIY or ready-made) so I always prewash my fabric in cold water. If there’s a chance you’ll be washing your carrier in hot/warm then prewash your fabric that way.
If your fabric is around 60 inches wide and you don’t lose much to shrinkage you could get away with 1.5yds. Personally I would buy a minimum 2 yds (for 56 to 60 inch fabric) or 2.5yds (for 44-54in fabric) or a tablecloth that’s a minimum of 60 x 60in. If budget allows it never hurts to get a little extra, I like having some wiggle room to make mistakes.
- Suitable fabric-
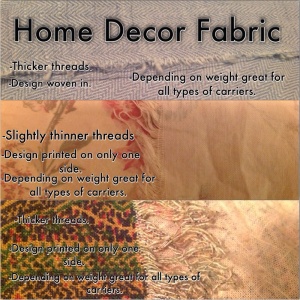
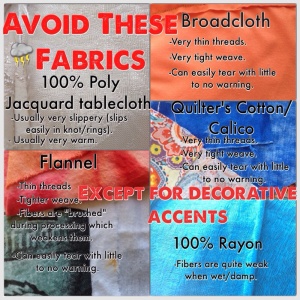
Look for natural fibers like cotton and linen, synthetics like polyester are often slippery (though not always) and can be warmer than natural fibers. Avoid higher amounts of rayon and spandex/Lycra. Fiber content isn’t the only thing to consider when choosing fabric, weight and weave also play a big roll. You want to stay away from thin light fabrics, especially those with a very tight weave comprised of tiny weak threads (for example bed sheets and quilters cotton. They can be fine for a decorative layer but something sturdier needs to be used for the rest). Look for bottomweights, fabrics that would make a nice pair of pants. If a weight is listed 6-7oz/yd is a good range to stay in. Twill, denim, jacquard, and lighter duck/canvas are great choices. A lot of times home decor fabric sites will describe a suitable twill/duck/etc as “lightweight” even when it’s around 7oz. That’s because home decor fabrics are typically very heavy and 6-7oz is a light range for them. If you’re looking on a site and the weight isn’t listed you can try googling the fabric name/manufacturer to see if it’s listed on other sites (it’s not always but I’ve found quite a few that way). Premier Prints carries a great lighter duck as well as twill in a ton of fun prints, fabric.com carries both and Hobby Lobby also carries the same prints of lighter ducks (but I don’t think it says premier prints on the bolt there). Fashionfabricsclub.com often has great prices for suitable denim, stay away from the ones described as stiff, you want soft and moldable. Walmart carries a suitable duck by Waverly (will say WV DK on the bolt) as well as some nice cotton jacquard. Joann has some great denim and twill in the bottomweight area of the apparel section. Osnaburg (which is a lightweight cotton fabric that’s popular for for wraps/ringslings) is typically around 4.5oz and too light to be used for the structural panel, something sturdier needs to be used with it.
A few examples of home decor fabric-
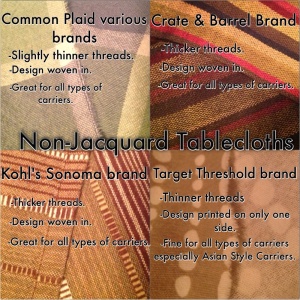
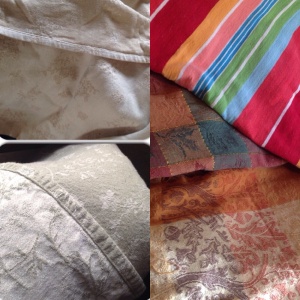
Tablecloths can make great choices, as with off the bolt fabric look for natural fibers. Avoid any tablecloths that feel slippery (which usually have a high poly content), are vinyl or have a coating, or thin/light like a bed sheet. Target Threshold brand tablecloths make great onbus, you can usually get them on clearance for around $10 (or grab them still new in package from the Goodwill, they seem to always get Target’s leftover clearance stock). They’re typically just printed on one side though I have come across a few that had the stripes woven in. Kohls and Homegoods often have suitable tablecloths in a variety of types; printed,jacquard, and stripes/plaids. The Christmas Tree Shop carries cotton jacquard tablecloths but they’re a bit on the thin side so I would personally use 3 layers for the body of those. Mahogany is a great reputable tablecloth company that can be found on amazon.com, they sell printed as well as cotton jacquard tablecloths.
A few examples of suitable tablecloths-
I like to check thrift stores for suitable tablecloths, I’ve been able to make carriers for as little as $1! When buying fabric or a tablecloth from a thrift store (or yard sale) you need to thoroughly look it over and check for holes and any other signs of wear. Avoid anything that’s very obviously old (sometimes tablecloths will have a date on the tag and older home decor fabric can have a date along the selvedge). You don’t want to use anything with compromised fibers. If you choose to check out the thrift stores I would first suggest going to a fabric store and touching everything. Familiarize yourself with how fabrics feel, natural fibers and synthetics. That can help you identify what you find at the thrift shop (you can also do a burn test if you decide to buy, some great results come up if you google “burn test chart”). Tablecloths at the thrift store may not have a tag with fiber content or size, if it feels slippery or more like a bed sheet then don’t buy it. I like to bring my soft tape with me when I go thrifting but if you forget to bring one you can use your body to measure! On most people it’s approximately 25in-30in from armpit to finger tip, that can help give you an idea of length of your tablecloth. Look for at least 60in in length (even round tablecloths will generally work for onbus/buckle bus). Personally I’ve had the most success with finding gems at the Salvation Army.
- Padding
I like to use 3-4 layers of felted wool for straps and 2-3 layers for padded headrest (from felted sweaters, pick them up cheap at the thrift store. Thicker sweaters will make cushier padding). To use wool you would need approximately 1 size large or extra large wool sweater. Some people like to use layers of fleece. To use fleece you could use a lg/XL fleece pullover, small fleece blanket, or around a yard of fleece off the bolt. Some like firmer padding like 1in high density foam (found at craft stores like joanns). If you use foam I would get around half a yard (or a minimum of a 15x17in cushion, but that won’t give you padding for the head rest, and possibly not the leg padding, you would need to supplement for something else if you choose to do those).
For the straight straps I used 4 layers of felted wool, each piece 3x16in.
For the curved straps I cut 4 layers from rectangles that were around 6×18, they’re around 2.75in wide.
For the leg padding I used 3 layers 6×1.5in each.
For the headrest I used 2 layers around 6x10in.
- Hardware
I used plastic-buckle.com to purchase my supplies. Even with shipping their prices were great and everything I bought was weight-rated. You don’t want to use random buckles or craft store buckles that weren’t meant to bear much weight. I underestimated the amount of webbing I would need and I only ordered 5 feet. If I wasn’t doing PFAs or a chest clip that would have been plenty. Luckily I still had webbing hanging around from an Infantino Balance I took apart so I was able to supplement with that. Between the two I used a total of 92in (or about 7.6 feet) plus 33in of fabric for the chest clip (for the buckle bu with PFAs, for the basic buckle bu I only used 41in). 2 ladder locks were used for the PFAs and 2 ladder locks for the bottom webbing. 2 sternum adjusters and one single side release buckle for the chest clip.
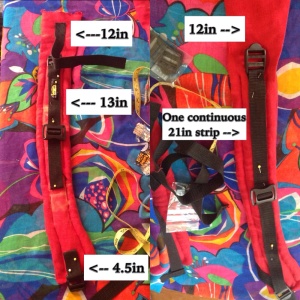
Webbing used for curved PFA straps-
2 12in pieces for PFA
2 13in pieces for sternum adjuster and PFA ladder lock
2 4.5in pieces for bottom ladder lock
2 17in pieces to secure in the body and get threaded through the strap’s bottom ladder locks.
Making a pattern and cutting out your pieces-
Wrapping paper that has the grids on the back works really for drafting a pattern. Other things you can use are brown paper bags, news paper, or just sheets of paper taped together. Don’t be afraid to draw it out multiple times or test on scrap fabric. I had 3 versions of curved straps before I settled on the ones in the tutorial (and even then if doing it again I would add half an inch to the width of the straps!). I decided on a more subtle curve but you could definitely make the curve more pronounced (and tracing around the side of a large bowl or plate can be helpful in drawing that curve). Since the straight straps are just two rectangles you really don’t need a pattern for those. For the body panel I chose to have a slight curve on the sides. To help your panels be symmetrical fold your pattern in half (with the fold being the center) and then cut so that you’re cutting both sides at the same time (or just make half a pattern with the one side being your fold line and cut your fabric along a fold).
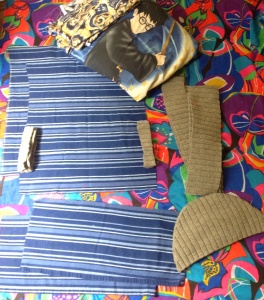
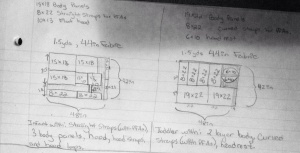
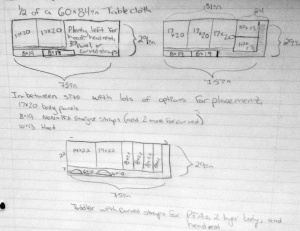
I strongly recommend tracing your pieces out with chalk before cutting the fabric. Depending on how much fabric you have one wrong cut could mean not enough fabric to finish the project. Below are a few examples of pattern placement, I have taken an average amount off for shrinkage but you might end up with slightly more or less fabric after prewashing.
You can make your panels any size to suit your needs but a good range to stay in would be 15x18in for infant and 19x22in for toddlers. I actually went between those two sizes for the two I made in this tutorial. My 15month old is a little too big for the infant size and a little too small for the toddler size (I based panel sizes off of the traditional style onbus I typically make). You will need 2-3 panel pieces.
Depending on how severe your curve is you may not need the entire 8in width for the curved straps. If you’re doing PFAs then 22in is a good length, if you’re not using PFAs I wouldn’t go over 19in.
So for the curved straps with PFAs I used four 22x8in pieces.
For the straight straps I used two 22x8in pieces.
For the hood I used two 13×9-10in pieces.
For the hood loops I used two 3×1.5in pieces.
For the hood straps I used two 24×1.75in wide pieces.
For the headrest (if you’re not doing a hood) I used two 6x10in pieces.
For the chest strap I used one 25×3.5in piece and one 8×3.5in piece.
For the slipcover I used two 22×18.5in pieces.
Assembling the straps-
The 22in that I have slated for strap length includes 3in where the fabric is secured inside and 3in of unpadded area for the PFAs (perfect fit adjusters) as well as a small amount at the bottom to turn in and stitch shut. I wanted the option for longer straps so that both myself and my husband could comfortably use it, feel free to take an inch or two off the length. If you’re not doing PFAs I would recommend around 19in (so you end up around 16in after sewing, but you can measure the distance you need to be sure). I would not suggest adding to the length, you want the straps short enough to do a high back carry (buckle bus are not meant for low carries).
- Straight Straps
As these are just 2 rectangles I did not make a paper pattern. I want my finished length around 16in so I’m making these 19×8. If you’re doing PFAs stay around 22in.
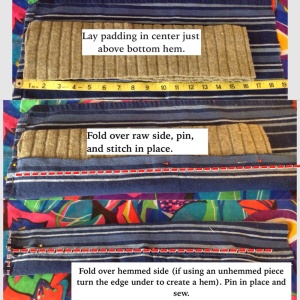
Mark 6in down (or 3in if you’re not doing PFAs) from the top of your strap piece and place padding in the center of the rectangle with the top edge at the 6in mark. Fold one side of your strap fabric over the padding and pin in place and stitch it down. Fold the other side of the fabric over the padded area, make sure to fold the edge over so that you have a clean hem. Pin in place and stitch down, also sew the bottom.
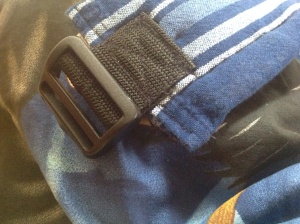
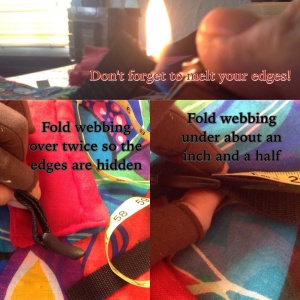
I’m making this a very basic strap with just a little bit of webbing to secure the strap to the body panel. Take a 4.5in piece of webbing, thread the ladder lock on and fold twice so both melted edges are hidden. Stitch on with an x-box towards the bottom of the strap.
- Curved Straps
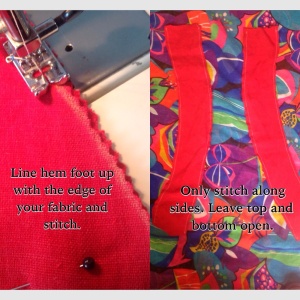
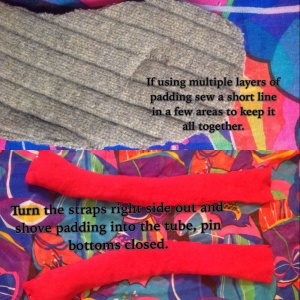
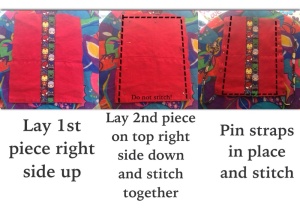
Lay two strap pieces together, with right sides together (so that the wrong side of both pieces is facing out), stitch both long sides together leaving the top and bottom open. Do the same for the other strap. Turn right-side out and iron.
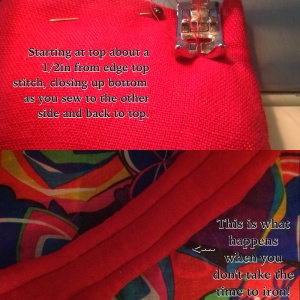
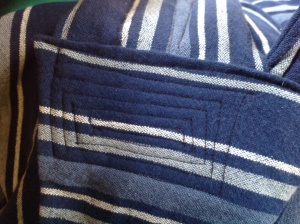
Shove your padding into the tube you just made making sure the padding and the strap have the curve going in the same direction. Do 1-2 lines of top stitching (I like to do 2 lines, one near each side but other people prefer just one line down the center. Your goal is to keep the padding in place).
- adding the webbing/buckles
It would probably be easier to do this a continuous piece but I underestimated the amount of webbing needed and do not have enough for one continuous piece. Make sure you melt the ends of all of your webbing pieces to keep them from unraveling.
Pin everything in place prior to sewing to ensure you like the placement. First Draw a line 3in from the top of the strap.
Pretend that there’s a 12in piece of webbing pinned to the top of the strap on the right in the photo above.
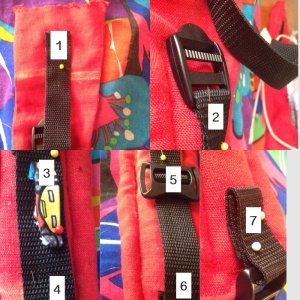
1. Lay the 12in piece of webbing in the center of the strap with 1.5in of it above the line. Pin in place (this is part one of your PFA).
2. Take a ladder lock and thread it through the 13in piece of webbing, folding the melted edge under around 1.5in. Make sure it’s not backwards and pin in place right around where your padding starts (make sure it’s pointing up so that you can thread the 12in piece through it, this is part two of your PFA).
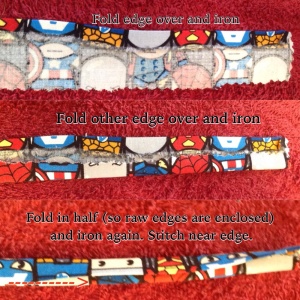
3. Next is your strap loops. Cut out two 1.5x3in rectangles. Fold the edges over, iron, fold over and iron again. Fold the short ends under and pin in place.
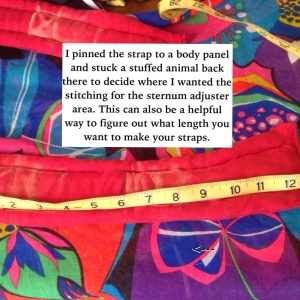
4, 5, 6. Pin the webbing where you marked the strap for the sternum adjuster area, slide on sternum adjuster, and pin webbing with about 1.5in folded under.
7. For the bottom ladder lock take a 4.5in piece of webbing, slide ladder lock in place making sure it’s not backwards and fold twice so raw edges are hidden. Pin in place near the bottom of the strap.
Make sure you’re happy with the placement and sew everything down with x-boxes (except the strap loops, I just did a few rows of stitching at the ends).
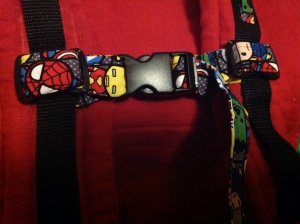
For the chest strap you’ll need either 33in of webbing or a 25×3.5in strip of fabric and a 8×3.5in strip of fabric.
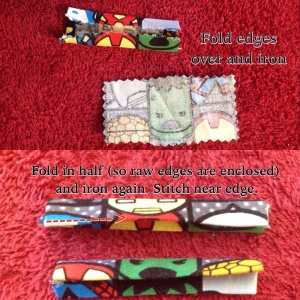
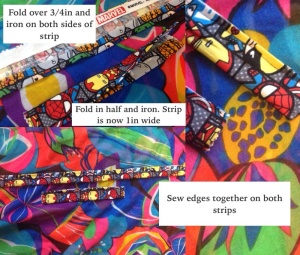
Lay fabric wrong side up and fold and iron edges over .75in. Do this to both long sides of both strips of fabric. Fold strips in half and iron so that they’re 1in wide. Hem the edges. Close up one end of the long strip (or all of the ends, then you won’t have to fold over the raw edges later).
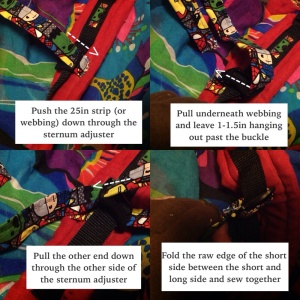
Push the 25in fabric strip (or webbing piece) down through one side of the sternum adjuster. Pull fabric underneath the webbing and leave 1-1.5in hanging past the buckle. Making sure your fabric isn’t twisted pull the other side of the fabric down through the other end of the sternum adjuster. Fold the raw edge up so it’s sandwiched between the long end and short and and stitch together.
Repeat for 8in piece on the other side except this time you’re sliding the stationary side of a single side adjust buckle onto the long side of the fabric strip and you’re enclosing both long edges. After I sewed them together I moved the bulky seam over so it was on the strap instead of just off of it.
Thread strap through the buckle.
Assembling the body
- 3 Layer body with seat darts
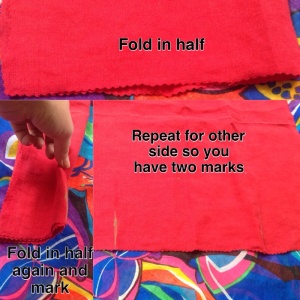
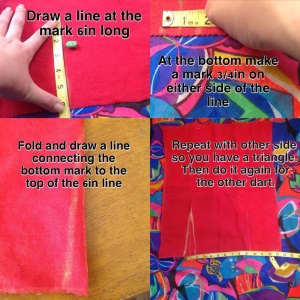
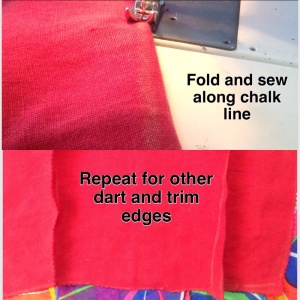
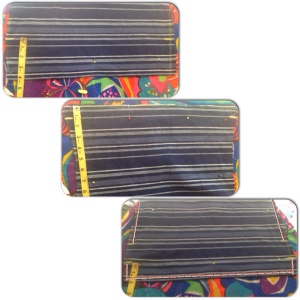
Mark the spots where you’ll be placing the darts. The easiest way I found was fold the piece in half and then fold that in half one more time, mark the folded edge, now fold the quarters the other way and mark. Draw a 6in line from the bottom up (the line will be over the dart mark). Using the 6in line as your center make a mark on either side so that you have a base of 1.5in (so 3/4in on either side of your line). Fold with your 6in line on the fold and draw a line down from the top on the 6in line down to the mark you made for the base. Do the same for the other side. Repeat it all for your 2nd dart. You can either cut out the two triangles you just made and then stitch the edges together or you can fold it so that the 6in line is on the fold and stitch along the line you made then trim the excess fabric. Repeat for all 3 body panels.
Lay out your internal anchor panel. Pin your straps in place and using chalk mark where you want your stitching to start (you do not want to stitch close to the edge, I like to go down about 3/4in from the edge that way there is enough room to enclose the edges after you’ve assembled all layers. If you stitch too close the the edge then you’ll end up with a raw edge poking out). Pin your webbing in place 2in up from the bottom.
There are many ways to reinforce them, bar tacking and x-boxes are both popular methods. I like to do reinforced rectangles for bigger areas like straps (though I’ll be doing x-boxes on the webbing). Double check one last time that everything is even and stitch your straps and webbing in place.
Stack your panels-on the bottom of the stack place your back panel with the right side facing up, next stack the front panel with the wrong side facing up (so that the two outer panels have their right sides facing each other). On the top of the stack place the internal panel with the wrong side up (so that you see the back of the straps. If you place it with the straps facing up then they’ll be backwards when you turn it right side out).
Pin your layers together making sure everything is even. I usually start/stop stitching an inch from openings so that I have plenty of room to turn them in after it’s assembled. Leave the top open and stitch along the sides and the bottom. DO NOT STITCH OVER THE STRAPS OR WEBBING OPENINGS!
Using the open top turn everything right-side out, turn in your edges and iron (be very careful to not iron over anything that has webbing, you do not want to iron the webbing as you could melt it).
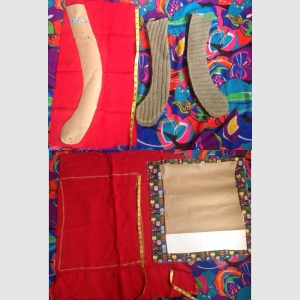
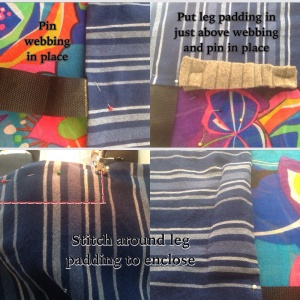
Using the opening at the top take your leg padding and shove it in along the side, starting at your webbing (I actually forgot to put leg padding in this one but you can see it in the 2 layer body). Pin in place and stitch around it (so it’s trapped in a little pocket of sorts). You will not be closing up the top until your hood/headrest has been assembled. After you’ve attached your hood/headrest close up any open areas by top stitching (folding the edges to the inside so there are no raw seams showing).
- Basic 2 layer body
Place your body panels with the right sides together and pin in place. Make a mark on each side approximately 4in up from the bottom and another about 1in down from the top. Stitch each side from the 1in mark to the 4in mark. Measure 2in up from the bottom on each side and make a mark. Starting at your mark sew down the side, pivot, and sew along the bottom, pivot and sew up to the other mark.
Turn right side out and iron, folding your raw edges in evenly. Place your 16in webbing about 2in inside the webbing openings and pin in place. Using the opening at the top take your leg padding and shove it in along the side, starting at your webbing. Pin in place and stitch around it (so it’s trapped in a little pocket of sorts).
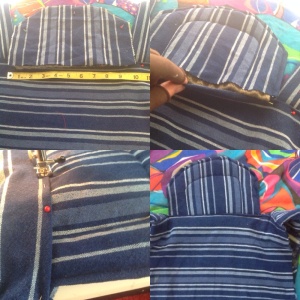
Pin your straps in place. You’re going to assemble your hood/headrest first.
After you’ve added your hood/headrest top stitch all the way around and reinforce your straps and webbing.
I like to do a few lines of top stitching.
Headrest-
Measure the distance between the two straps and base the length of your headrest on that. Cut out two half circles (or whatever variation, I like mine a little more angled) around 6in tall. Cut out your padding just a tad bit smaller than the fabric. Put the two layers of fabric right-sides together and stitch from one corner around the curve to the other corner making sure to leave the bottom open. Turn right-side out, iron, and slide padding in. Make sure it fits nicely inside the headrest, make adjustments as needed. Top stitch to secure padding in place. For the 3layer body sew one or two lines of stitching only to the middle layer and then pin everywhere that’s open together and top stitch. For the 2layer body just slide it in between the straps and pin in place. Making sure both body panels are even top stitch the carrier so you’re securing the headrest in place and closing up any open areas.
Flat Hood-
Cut out two 10×13 rectangles, you can angle them a little if you’d like, so the end going inside the carrier (what I’ll refer to as the top) is 8-9in wide and the other end (what I’ll refer to as the bottom) is 10in. Iron in a hem (I believe I did around a half inch). Lay them with right sides together and pin in place. Starting at a bottom corner stitch up the side, across the top, and back down to the other bottom corner. LEAVE THE BOTTOM OPEN! Turn right side out and iron.
Now it’s time to make the straps. Cut out two strips 24in long and 1 3/4in wide. Fold in edges, iron, fold in edges again, iron again, and stitch together (you could go narrower and just stitch them wrong sides together and turn and top stitch but I don’t have the patience for turning such a narrow tube, lol. This is where a turning tool would come in handy!).
Shove one strap down inside the hood, one up against each side with the end around 2in from the top of the hood. Put a few lines of stitching at the end to secure it and then pin it in place so it doesn’t shift around when you sew (you don’t want it getting caught in the channel you’re sewing). Starting at the bottom stitch a line up to the top of the hood, running along the side of the strap. Repeat steps with other strap. Stitch the bottom closed making sure to not sew over the straps. Secure to onbu using the same methods as the headrest above.
****After everything is sewn and you have your buckles threaded properly fold over the ends of your webbing twice and stitch in place. This keeps the webbing from sliding out of the ladder locks.
to make a reversible slipcover-
I’m sure there are other methods for slipcovers but this was just the easiest way for me to do it on a carrier where the straps are not detachable (if you used single side adjust buckles instead of ladder locks you could make a regular slipcover since you’d be angle to undo the straps).
Lay your onbu on top of your slipcover fabric, starting about 1.5in from the edge of your onbu trace all the way around.
Cut out both layers of fabric.
On both layers of fabric turn all edges in twice, iron, and stitch down.
Mark all spots where you will be adding snaps. I used a snap on either side of the straps and webbing as well as a few more along the sides for a total of 12 sets of snaps.
Add snaps to the marked areas. Make sure you only use caps/sockets on one panel and caps/studs on the other panel.
Lay one panel with the wrong side (snap side) facing up and lay the buckle bu on top of it.
Lay the other panel wrong side (snap side) facing down.
Do up all snaps.
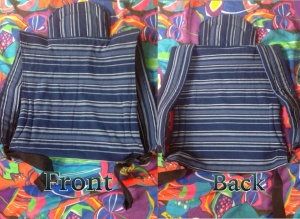
Voila! You now have a reversible slipcover!




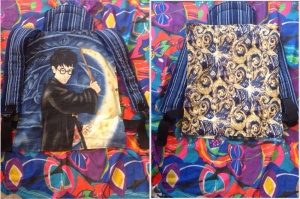
Very nice!
LikeLiked by 1 person
Awesome Job!!!!! Can’t wait to make one!!!
LikeLiked by 1 person
Looks great! Is this only for a back carry? I have a 6 month old that I’m not quite ready to do back carry with until she spits up less often.
LikeLike
You can do front carries though I personally find them a little more difficult than in a regular ring/loop onbu.
LikeLike
Thank you so much for such an extensive tutorial. I loved it for making my first buckle bu today! You had every picture I wanted and measurements of webbing/cloth/etc laid out nicely. Props!
LikeLiked by 1 person